> ## Documentation Index
> Fetch the complete documentation index at: https://chatbase.co/docs/llms.txt
> Use this file to discover all available pages before exploring further.
# Email
> Let your AI agent read and reply to customer emails automatically through your company's email system
## Overview
Chatbase's Email integration enables your AI agent to automatically respond to customer emails, providing instant support directly through your company's email system. Setup takes a few minutes and gives you AI-powered email automation across your organization.
Have routine email support answered the moment it arrives, in your brand's voice, with your team notified the instant delivery goes wrong.
## Before you start
1. [Create a Chatbase account](https://www.chatbase.co/auth/signup) and build your AI agent
2. Configure your email domain in [Email settings](/docs/user-guides/chatbot/email-settings) with proper authentication (DKIM, SPF, forwarding)
3. Have an active Chatbase AI agent ready for deployment
**Domain configuration required.** Email integration will not function until your email domain is properly configured with forwarding, DKIM, and SPF records. Complete domain setup in **Settings → Email** before deploying. You must also use a **company email**.
## How Email integration works
The integration lets your AI agent monitor and respond to incoming emails through your configured addresses:
1. **Email reception**: Incoming emails are forwarded to your Chatbase AI agent
2. **AI processing**: The AI agent analyzes the email content and determines the appropriate response
3. **Automated reply**: The AI agent generates and sends a contextually appropriate response
4. **Delivery monitoring**: The system tracks delivery and alerts you of any issues
This loop pauses when your AI agent escalates by creating a **Zendesk** ticket. The AI agent stops replying to the email thread, your team answers from Zendesk, and the AI agent resumes once the ticket is **Solved** or **Closed**. See [Email handover with Zendesk](/docs/user-guides/chatbot/actions/escalate-to-human#email-handover-with-zendesk).
## How to connect Email
Navigate to your [Chatbase dashboard](https://www.chatbase.co/dashboard/) and select the AI agent you want to integrate with email.
If you haven't created an AI agent yet, follow [Your first AI agent](/docs/user-guides/quick-start/your-first-agent) to get started.
Navigate to **Settings → Email** and follow the domain configuration process. See [Email settings](/docs/user-guides/chatbot/email-settings) for detailed instructions.
Verify all configuration steps are complete before proceeding. Email addresses with configuration issues will display warnings.
1. Navigate to **Channels → Email**.
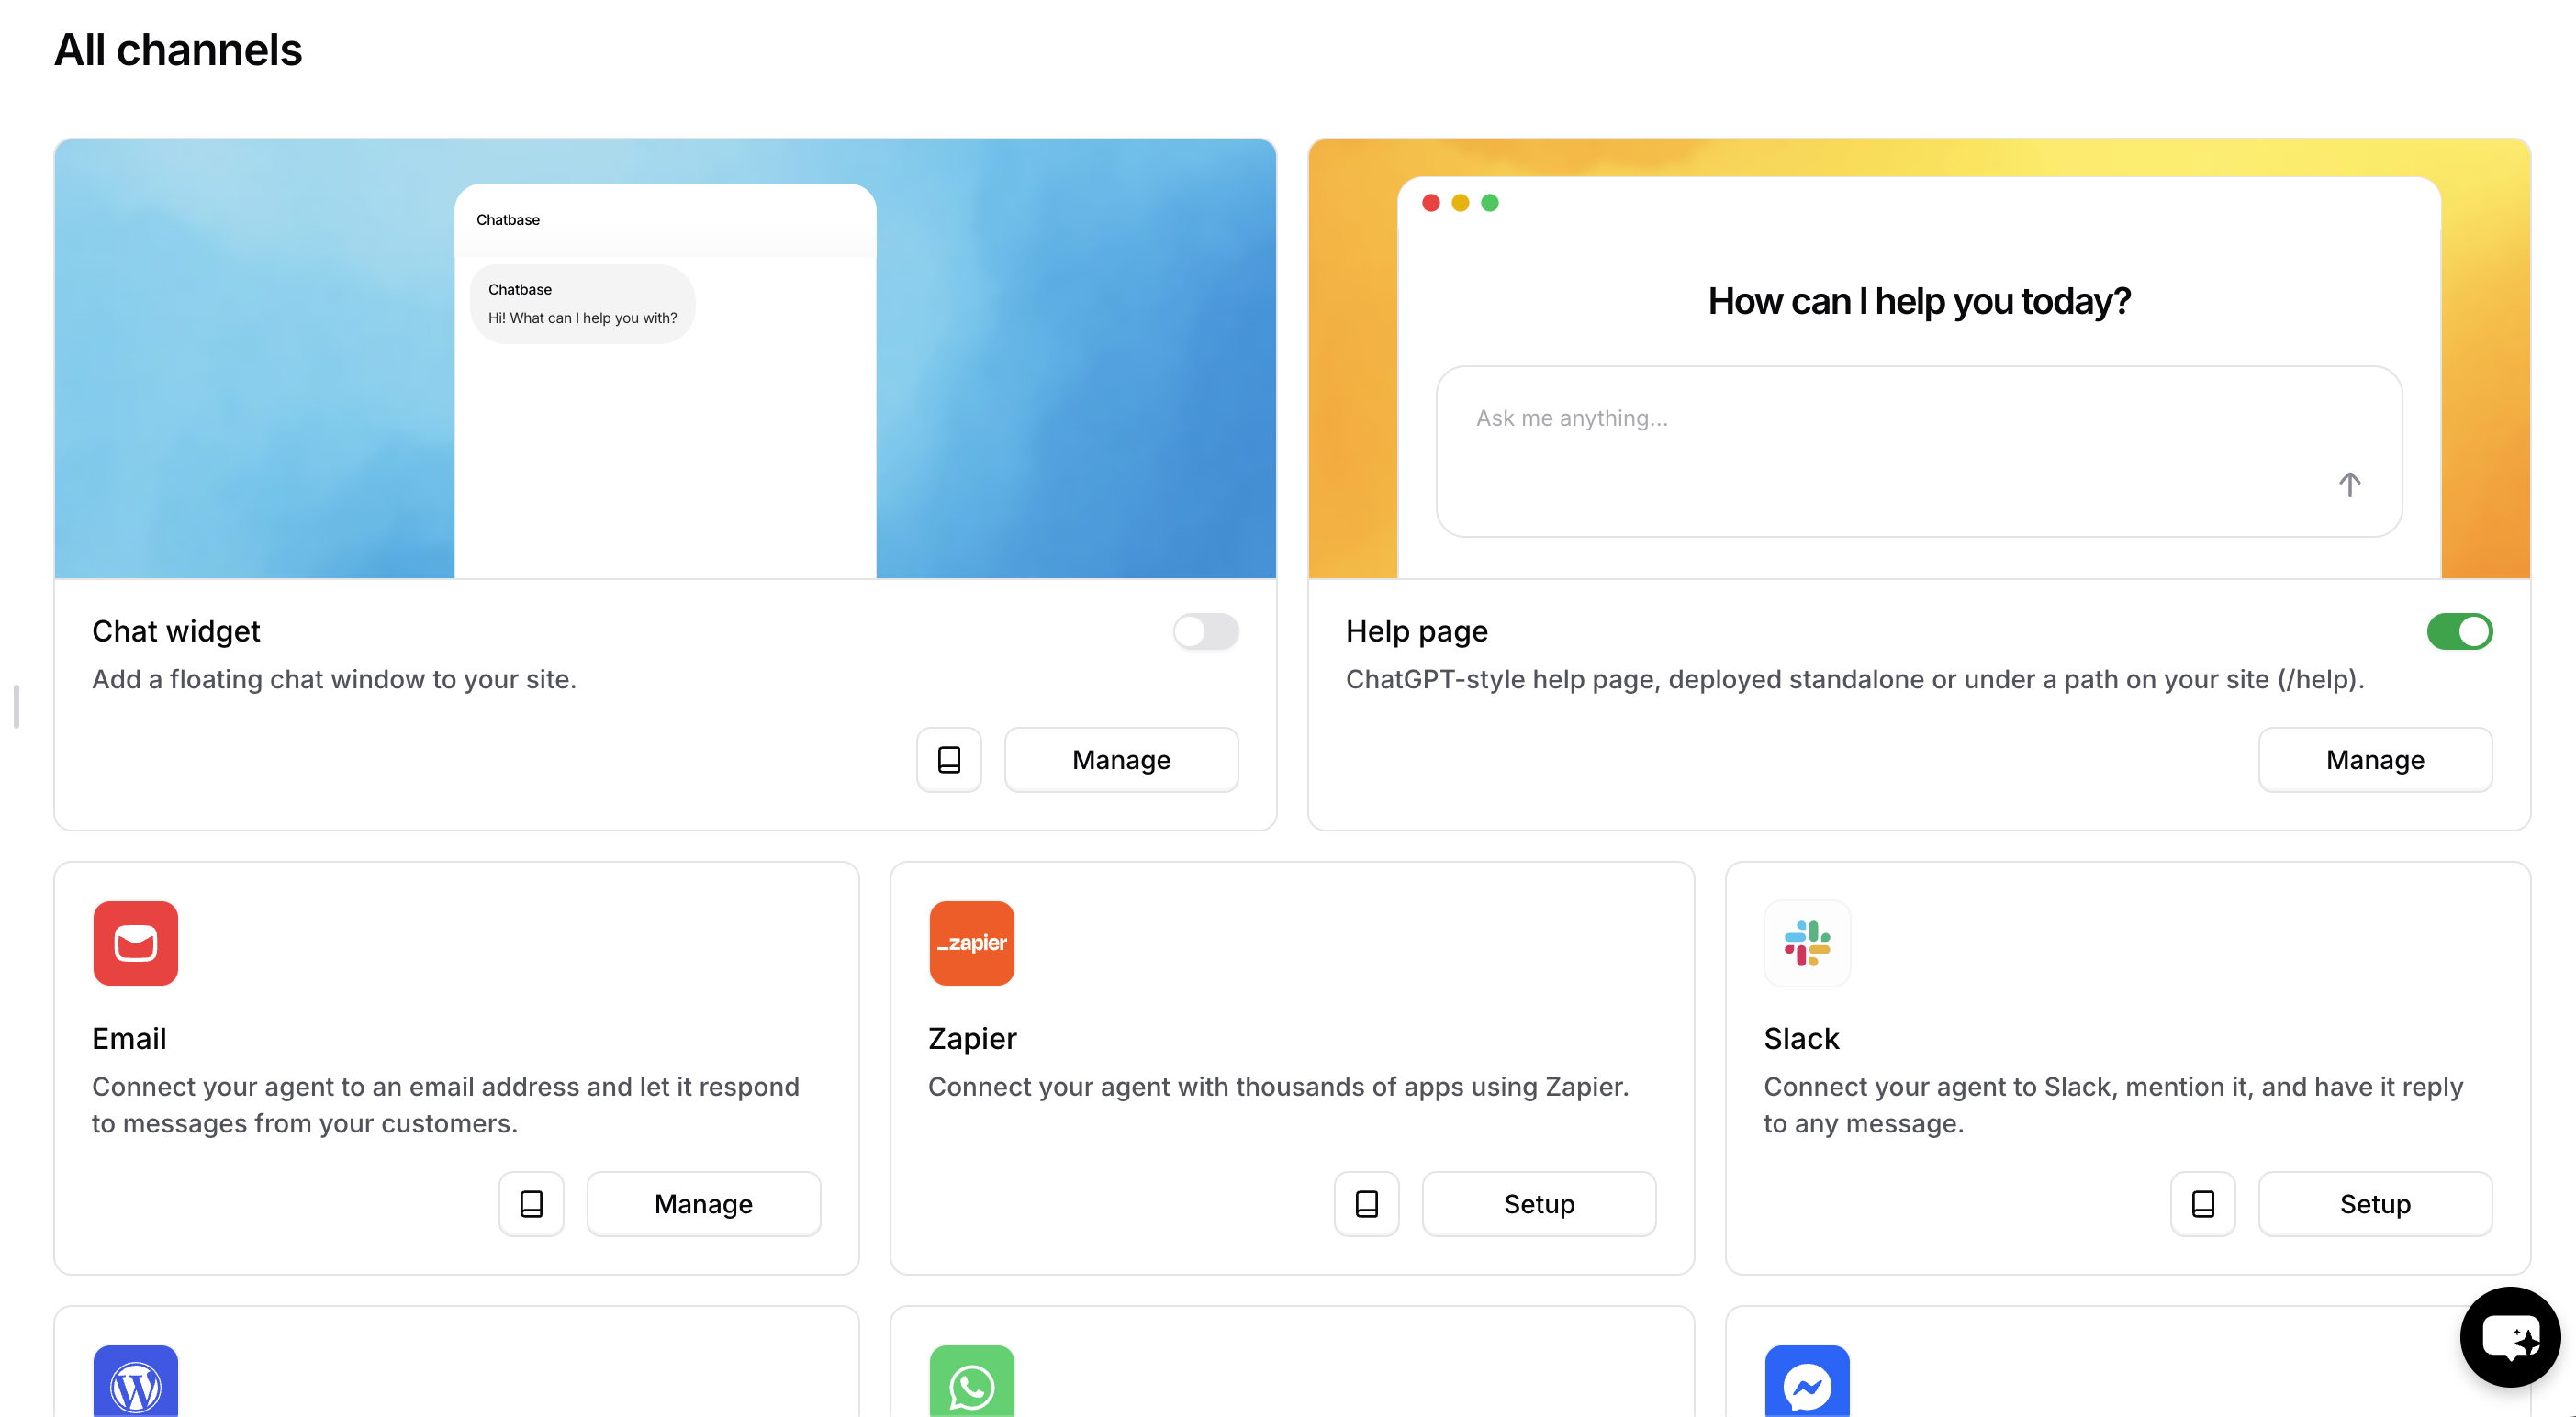 2. Click **Manage** to access email deployment settings.
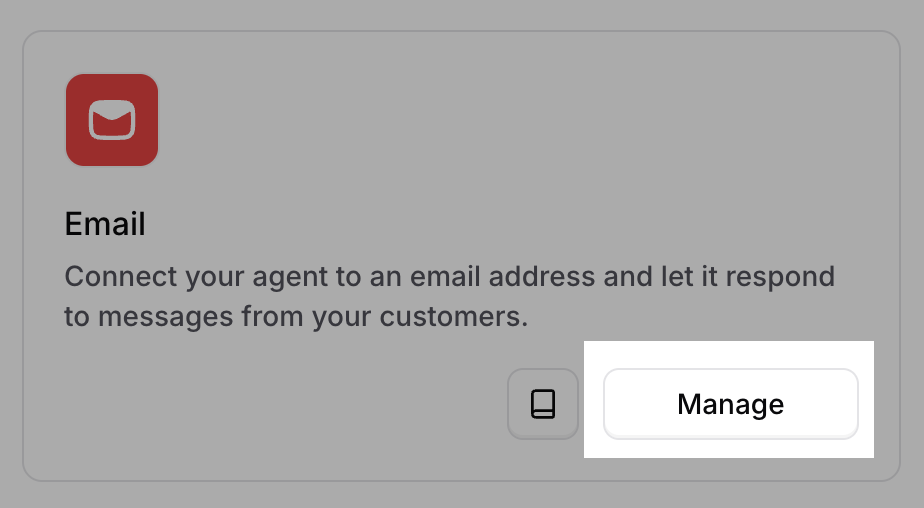 3. Click **Deploy** and toggle the channel to **Enabled**.
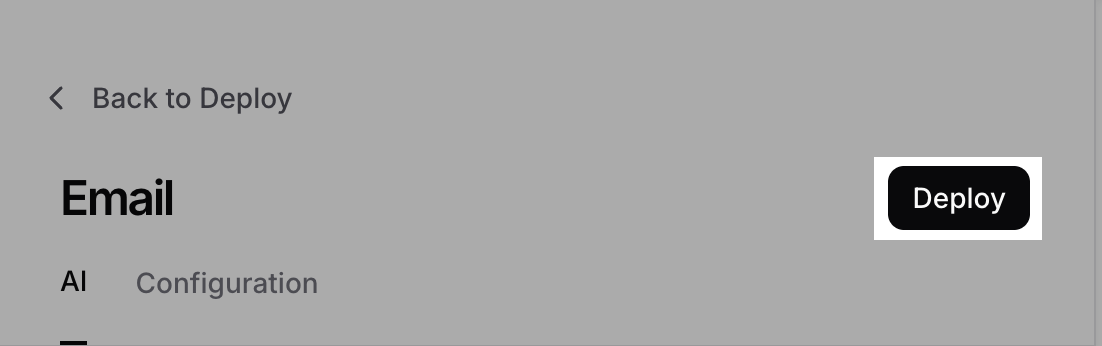 Configure your AI agent's email behavior and appearance from **Channels → Email → Manage**. See [Settings](#settings) below.
 Send an email to your configured address and confirm your AI agent replies, with the display name and signature you set.
## Settings
Customize how your AI agent sends and formats emails to match your brand and communication standards.
### Reply Address
Select which configured email address appears as the reply-to address for AI-generated emails.
Choose from your verified email addresses. Addresses with configuration issues (forwarding, DKIM, or SPF not enabled) display warnings, and you won't be able to select them.
### Deliverability Alert Contact
Designate a team member to receive notifications about email delivery failures and issues.
Select from your account members, or choose "None" to disable delivery alerts.
**Recommended**: Assign this to your technical or support team lead so delivery issues get resolved quickly.
### Blocked senders
Add email addresses that should never receive an AI reply. Emails from blocked senders are still saved to your conversations.
### Email Display Name
Set the sender name recipients see when they receive emails from your AI agent.
This name appears in the "From" field and represents your brand identity in customer communications.
**Examples**: "CustomerSupport at \[Company Name]", "\[Company Name] AI Assistant", "Helpdesk".
### Spam detection
Enable **Spam detection** to use AI to identify suspected spam. Suspected spam is saved to your conversation logs but doesn't receive an automatic AI reply. You can still reply to these conversations manually.
#### Whitelisted senders
Add email addresses that should always receive an AI reply and bypass **Spam detection**.
### Reply Delay
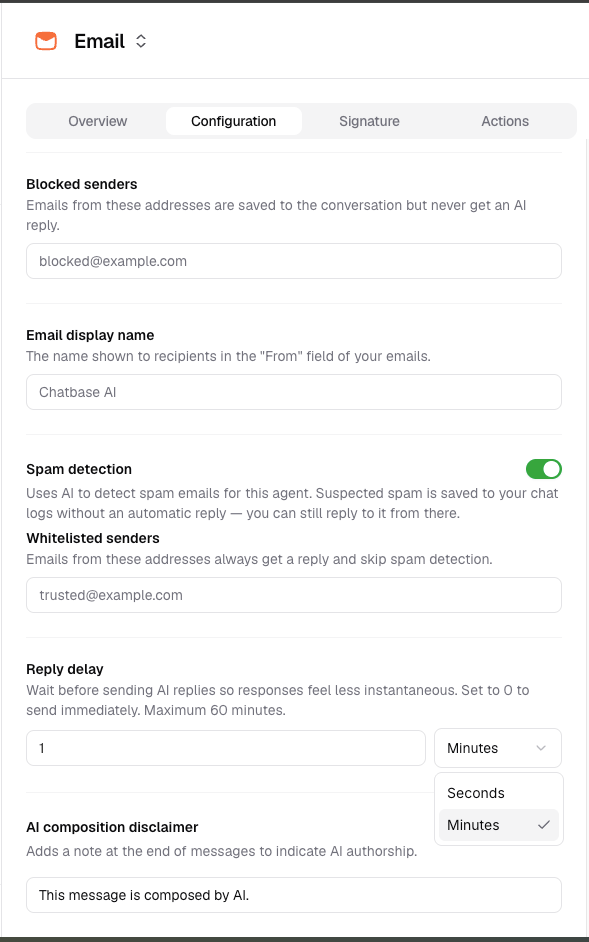
Hold each AI-generated reply for a set time before it's sent. An instant response can feel automated; a short delay makes replies read like they came from a person, and gives your team a window to step in before an email goes out.
Enter a duration and choose **seconds** or **minutes**. The maximum delay is 1 hour. Set it to 0, or leave it empty, to send replies immediately.
Send an email to your configured address and confirm your AI agent replies, with the display name and signature you set.
## Settings
Customize how your AI agent sends and formats emails to match your brand and communication standards.
### Reply Address
Select which configured email address appears as the reply-to address for AI-generated emails.
Choose from your verified email addresses. Addresses with configuration issues (forwarding, DKIM, or SPF not enabled) display warnings, and you won't be able to select them.
### Deliverability Alert Contact
Designate a team member to receive notifications about email delivery failures and issues.
Select from your account members, or choose "None" to disable delivery alerts.
**Recommended**: Assign this to your technical or support team lead so delivery issues get resolved quickly.
### Blocked senders
Add email addresses that should never receive an AI reply. Emails from blocked senders are still saved to your conversations.
### Email Display Name
Set the sender name recipients see when they receive emails from your AI agent.
This name appears in the "From" field and represents your brand identity in customer communications.
**Examples**: "CustomerSupport at \[Company Name]", "\[Company Name] AI Assistant", "Helpdesk".
### Spam detection
Enable **Spam detection** to use AI to identify suspected spam. Suspected spam is saved to your conversation logs but doesn't receive an automatic AI reply. You can still reply to these conversations manually.
#### Whitelisted senders
Add email addresses that should always receive an AI reply and bypass **Spam detection**.
### Reply Delay
Hold each AI-generated reply for a set time before it's sent. An instant response can feel automated; a short delay makes replies read like they came from a person, and gives your team a window to step in before an email goes out.
Enter a duration and choose **seconds** or **minutes**. The maximum delay is 1 hour. Set it to 0, or leave it empty, to send replies immediately.
 **How it works**:
* The AI agent composes its reply as soon as the customer's email arrives, but the send is held for the configured time.
* While a reply is waiting, it appears in your conversation logs as a pending message with a countdown.
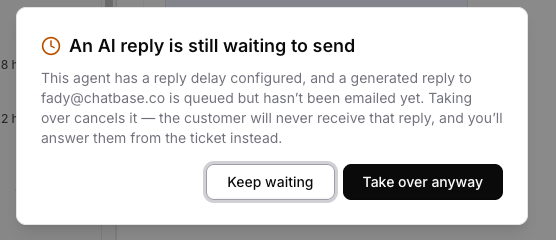
* [Taking over](/docs/user-guides/chatbot/help-desk/takeover) the conversation cancels any waiting replies. You're warned first, and if you proceed the customer never receives them and the unsent drafts are removed.
**How it works**:
* The AI agent composes its reply as soon as the customer's email arrives, but the send is held for the configured time.
* While a reply is waiting, it appears in your conversation logs as a pending message with a countdown.
* [Taking over](/docs/user-guides/chatbot/help-desk/takeover) the conversation cancels any waiting replies. You're warned first, and if you proceed the customer never receives them and the unsent drafts are removed.
 The delay applies only to automatic AI replies. Replies your team sends from the Helpdesk, and spam conversations you release manually with **Reply anyway**, are always sent immediately.
If a delayed reply fails to send, it's retried automatically. If it still can't be delivered, your [Deliverability Alert Contact](#deliverability-alert-contact) is notified and the reply is discarded.
### AI Composition Disclaimer
Add transparency by including a disclaimer that identifies AI-generated content.
When enabled, adds a customizable disclaimer at the end of emails. The default is "This message is composed by AI."
**Use cases**: regulatory compliance requirements, company transparency policies, building customer trust.
### Email Signature
Create a signature that appears at the bottom of all AI-generated emails.
Supports rich text formatting including multiple lines, links, styling, and contact information.
**Signature elements**: company contact information, social media links, legal disclaimers, unsubscribe options.
Remove **Powered by Chatbase** branding from your emails by purchasing the white-label add-on. See [Pricing](https://www.chatbase.co/pricing) for details.
## Common use cases
* **Customer support automation**: Handle common inquiries and FAQs automatically
* **Employee self-service**: Answer HR, IT, or administrative questions instantly
* **Lead qualification**: Screen and respond to sales inquiries with relevant information
* **Appointment scheduling**: Assist with booking and calendar management
* **Order status updates**: Provide shipping and order information on demand
**Getting started**: Begin with a focused use case like FAQ responses or status inquiries, then expand your AI agent's capabilities as you refine its performance.
## Limitations
* **A configured company domain is required.** Email won't function until forwarding, DKIM, and SPF are set up, and a personal email address can't be used.
* **The reply delay caps at 1 hour.**
* **Taking over a conversation cancels queued replies.** Anything waiting to send is discarded.
## Next steps
Configure your domain, authentication records, and verified sending addresses.
The delay applies only to automatic AI replies. Replies your team sends from the Helpdesk, and spam conversations you release manually with **Reply anyway**, are always sent immediately.
If a delayed reply fails to send, it's retried automatically. If it still can't be delivered, your [Deliverability Alert Contact](#deliverability-alert-contact) is notified and the reply is discarded.
### AI Composition Disclaimer
Add transparency by including a disclaimer that identifies AI-generated content.
When enabled, adds a customizable disclaimer at the end of emails. The default is "This message is composed by AI."
**Use cases**: regulatory compliance requirements, company transparency policies, building customer trust.
### Email Signature
Create a signature that appears at the bottom of all AI-generated emails.
Supports rich text formatting including multiple lines, links, styling, and contact information.
**Signature elements**: company contact information, social media links, legal disclaimers, unsubscribe options.
Remove **Powered by Chatbase** branding from your emails by purchasing the white-label add-on. See [Pricing](https://www.chatbase.co/pricing) for details.
## Common use cases
* **Customer support automation**: Handle common inquiries and FAQs automatically
* **Employee self-service**: Answer HR, IT, or administrative questions instantly
* **Lead qualification**: Screen and respond to sales inquiries with relevant information
* **Appointment scheduling**: Assist with booking and calendar management
* **Order status updates**: Provide shipping and order information on demand
**Getting started**: Begin with a focused use case like FAQ responses or status inquiries, then expand your AI agent's capabilities as you refine its performance.
## Limitations
* **A configured company domain is required.** Email won't function until forwarding, DKIM, and SPF are set up, and a personal email address can't be used.
* **The reply delay caps at 1 hour.**
* **Taking over a conversation cancels queued replies.** Anything waiting to send is discarded.
## Next steps
Configure your domain, authentication records, and verified sending addresses.