> ## Documentation Index
> Fetch the complete documentation index at: https://chatbase.co/docs/llms.txt
> Use this file to discover all available pages before exploring further.
# Sunshine
> Connect Sunshine Conversations so your AI agent can hand customers to a live human agent in Zendesk
## Overview
As part of Zendesk, Sunshine Conversations serves as a live chat solution. Integrating it with Chatbase gives your AI agent the ability to connect a customer to a live human agent for problems that need human interaction. This centralizes communication, so your support workspace can track and resolve inquiries efficiently.
Let the AI handle routine questions, and hand the customer to a live Zendesk agent in real time when the issue needs a person.
## Before you start
* A Chatbase account with an AI agent
* A Zendesk account on a **Professional** Suite plan or above
* **Zendesk** must already be connected in Chatbase before you connect Sunshine
This integration requires your Zendesk account to have a minimum Suite plan of **Professional** or above.
## How to connect Sunshine
1. Sign in to your Zendesk account as an Admin and navigate to the **Admin Center**.
2. Navigate to **Apps and integrations > APIs > Conversations API**.
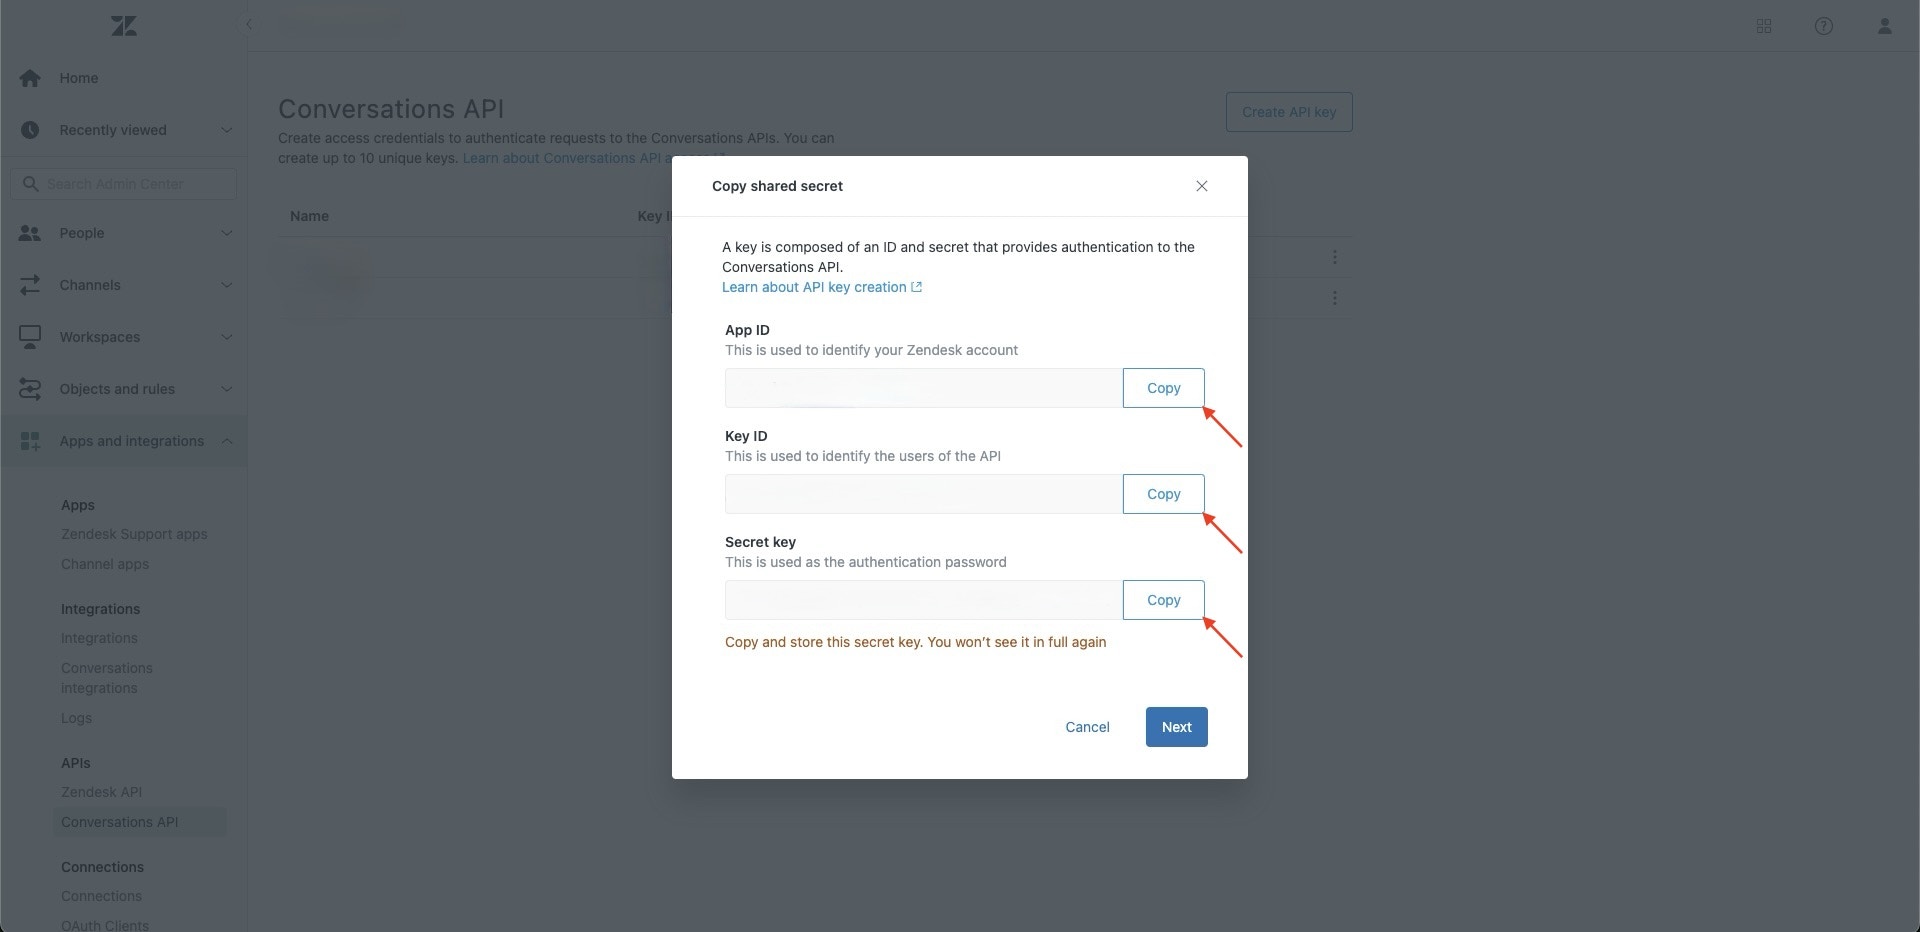
3. Click **Create API Key**, enter **Chatbase** as the name, and press **Next**.
4. Copy the **App ID**, **Key ID**, and **Secret key** displayed.
 1. Navigate to your Chatbase [dashboard](https://www.chatbase.co/dashboard/).
2. Click the AI agent you wish to enable live chat for.
3. Navigate to **Integrations**. Make sure **Zendesk** is connected before you attempt to connect **Sunshine**.
4. Enter the copied **App ID**, **Key ID**, and **Secret key**, then press **Submit**.
Multi-conversations lets the same customer open multiple tickets, one per conversation, at the same time. Since a customer can have several conversations open at once, this must be enabled for a smooth experience.
1. Sign in to your Zendesk account as an Admin and navigate to the **Admin Center**.
2. Click **Channels** in the sidebar, then select **Messaging and social > Messaging**.
3. At the top of the page, click **Manage settings**.
4. Under Web Widget and Mobile SDKs, expand **Multi-conversations**.
5. Click **Set up multi-conversations**.
6. Click **Turn on multi-conversations for your account**, select the channels you want to offer multi-conversations on, then click **Save**.
For more detail, see Zendesk's [Understanding multi-conversations for messaging](https://support.zendesk.com/hc/en-us/articles/8195486407706-Understanding-multi-conversations-for-messaging).
This lets AI agents end conversations when issues are resolved.
1. Sign in to your Zendesk account as an Admin and navigate to the **Admin Center**.
2. Click **Channels** in the sidebar, then select **Messaging and social > Messaging**.
3. At the top of the page, click **Manage settings**.
4. Under Advanced, expand **Ending sessions**.
5. Select **Agents can end messaging sessions at any time**.
6. Click **Save settings**.
For more detail, see Zendesk's [About ending messaging sessions](https://support.zendesk.com/hc/en-us/articles/8009788438042-About-ending-messaging-sessions).
This action lets all customers, both [identified](/docs/developer-guides/identity-verification) and unidentified, start a live chat from the Chat Bubble, Help Page, or Center Stage.
1. Navigate to your Chatbase [dashboard](https://www.chatbase.co/dashboard/).
2. Choose the AI agent you integrated with Sunshine Conversations.
3. Navigate to **Build > Actions**.
4. Click **Create Action**, then select **Sunshine live chat**.
5. Customize the **When to use** field, then save and enable the action.
Test the integration by asking your AI agent to speak to a human, and confirm the conversation reaches a live agent in Zendesk.
## Limitations
* **Sunshine requires Zendesk.** The Zendesk integration must be connected in Chatbase first.
* **A Professional Suite plan or above is required** on your Zendesk account.
* **Live chat needs an available agent.** If nobody is present to take the conversation, the customer waits.
## Next steps
Prefer an asynchronous handoff? Open a ticket instead of routing the customer to a live agent.
1. Navigate to your Chatbase [dashboard](https://www.chatbase.co/dashboard/).
2. Click the AI agent you wish to enable live chat for.
3. Navigate to **Integrations**. Make sure **Zendesk** is connected before you attempt to connect **Sunshine**.
4. Enter the copied **App ID**, **Key ID**, and **Secret key**, then press **Submit**.
Multi-conversations lets the same customer open multiple tickets, one per conversation, at the same time. Since a customer can have several conversations open at once, this must be enabled for a smooth experience.
1. Sign in to your Zendesk account as an Admin and navigate to the **Admin Center**.
2. Click **Channels** in the sidebar, then select **Messaging and social > Messaging**.
3. At the top of the page, click **Manage settings**.
4. Under Web Widget and Mobile SDKs, expand **Multi-conversations**.
5. Click **Set up multi-conversations**.
6. Click **Turn on multi-conversations for your account**, select the channels you want to offer multi-conversations on, then click **Save**.
For more detail, see Zendesk's [Understanding multi-conversations for messaging](https://support.zendesk.com/hc/en-us/articles/8195486407706-Understanding-multi-conversations-for-messaging).
This lets AI agents end conversations when issues are resolved.
1. Sign in to your Zendesk account as an Admin and navigate to the **Admin Center**.
2. Click **Channels** in the sidebar, then select **Messaging and social > Messaging**.
3. At the top of the page, click **Manage settings**.
4. Under Advanced, expand **Ending sessions**.
5. Select **Agents can end messaging sessions at any time**.
6. Click **Save settings**.
For more detail, see Zendesk's [About ending messaging sessions](https://support.zendesk.com/hc/en-us/articles/8009788438042-About-ending-messaging-sessions).
This action lets all customers, both [identified](/docs/developer-guides/identity-verification) and unidentified, start a live chat from the Chat Bubble, Help Page, or Center Stage.
1. Navigate to your Chatbase [dashboard](https://www.chatbase.co/dashboard/).
2. Choose the AI agent you integrated with Sunshine Conversations.
3. Navigate to **Build > Actions**.
4. Click **Create Action**, then select **Sunshine live chat**.
5. Customize the **When to use** field, then save and enable the action.
Test the integration by asking your AI agent to speak to a human, and confirm the conversation reaches a live agent in Zendesk.
## Limitations
* **Sunshine requires Zendesk.** The Zendesk integration must be connected in Chatbase first.
* **A Professional Suite plan or above is required** on your Zendesk account.
* **Live chat needs an available agent.** If nobody is present to take the conversation, the customer waits.
## Next steps
Prefer an asynchronous handoff? Open a ticket instead of routing the customer to a live agent.